Solving Techniques
There's a few tricks to solving Sudoku which make things easier - we've got them all! If you are familiar with basic sudoku solving techniques, you can jump to our advanced techniques
Basic Techniques
- Naked Single (Sole Candidate)
One of the simplest techniques used, the naked single is simply an empty square where its value can be deduced from looking at the contents of its row, column and 3x3 block. If 8 numbers have already been assigned to these neighbouring squares then its logical that the empty square must house the last remaining number.
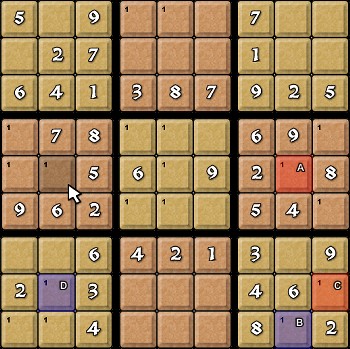
The highlighted square in this example must be a 7 because using any other number would create duplicates in the row column or block.
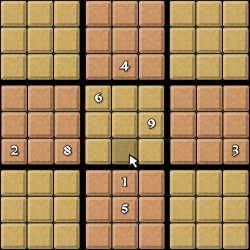
- Hidden Single (Unique Candidate)
Another simple technique, the hidden single is found when existing placements of a number reduce the potential squares for another instance of that number down to one.
For example, the center block here must contain a 4 (as it must contain all numbers from 1-9). The 4 in the left block rules out any of the top 3 squares, and the 4 in the right block rules out the bottom 3 squares (as there cannot be 2 4s in the same row). Since 2 of the squares in the middle row are already filled there is only one square left where the 4 can go.
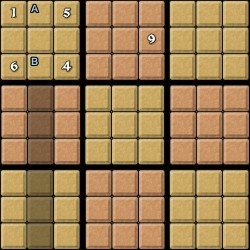
- Block and Column/Row Interactions
Sometimes a good technique doesn't always reveal an answer for an empty square, but it can whittle down the possible values. A single value in a row can sometimes predetermine a possible value in a block and this in turn can remove possible candidates from a column.
The number 9 here has forced block 1 to place its 9 in either square A or B, this in turn means that a 9 cannot appear in any of the other squares of that column.
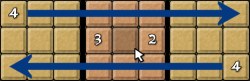
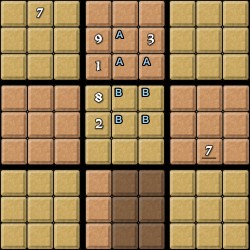
- Block and Block Interactions
This technique also removes candidates from empty squares, if two neighbouring blocks have some of their rows and columns blocked by a value, then the position for that value in the block can be whittled down. If this happens correctly you can also eliminate candidates from the adjoining 3rd block.
Here, the top 7 means that the center-top block must have its 7 in one of its right 2 columns (squares marked A). The other 7 forces the center-center block to also have its 7 in one of its right 2 columns (squares marked B). The center-bottom block must therefore have its 7 in its left column.
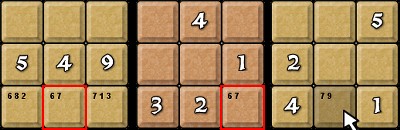
- Naked Subset (Naked Pair, Disjoint Subset)
Depending on the number of candidates used this technique can also be called 'Naked Triplet' or 'Naked Quad'. This is another technique used for removing candidates from a row, column or block, if two squares on a row have the same candidates then it is logical that any other square on that row cannot possibly house those values, and therefore can remove the values from their candidate list.
Our pencilling in here shows us that we have two squares that house the possible candidates 6 and 7. This in turn means that the shadowed square cannot be a 7 and must be a 9.
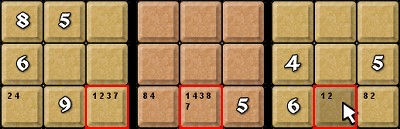
- Hidden Subset (Hidden pair, Unique Subset)
Once again depending on the amount of candidates used this technique can also be called 'Hidden Triplet' or 'Hidden Quad'. Similar to 'Naked Subset' this technique whittles down candidates from the empty squares we are interested in, not from the rest of the row, column or block. If three separate squares on a row house many candidates, but there are three common numbers that occupy at least one of the squares each then we can remove any other candidates from these three squares, leaving the three values as the only candidates.
We have three squares here that house the numbers 1, 3 or 7, we can simply remove all the other candidates from those squares and we are left with our shadowed square being a 1.
Advanced Techniques
- X-Wing
This solving method considers four interlinked squares. The technique takes two rows and finds four empty squares perpendicular to form a rectangle. The squares must be related to each other using a common value that is held as a candidate for each of the empty squares, there must only ever be two empty squares on each of the two rows that house that certain common value. Either top-left and bottom-right or top-right and bottom-left of this pattern will hold the true candidates, any other empty squares in the columns connecting the X-Wing can have the common value withdrawn from their candidate list.
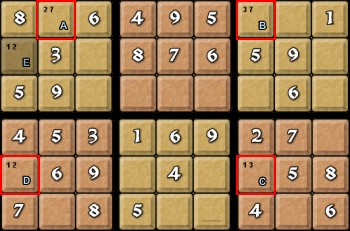
Because our three selected red squares all have 1 as their number we can create an X-wing. The shadowed columns have all their candidate number 1's removed.

- Swordfish
Very similar to the X-Wing method, the swordfish uses three rows that have up to nine empty squares that house the same candidate number, two empty squares from each row are selected and they must connect with another selected empty square from a different row through its column. This time we get two rectangle patterns in our puzzle. We can then eliminate the candidate number from any other empty squares along the selected rows or columns excluding our 'swordfish' squares. The final true positions for the candidate number will be in a diagonal formation using our 'swordfish' squares.
Our red squares all have the same candidate number 1, the shadowed squares are allowed to have the number 1 removed from their candidate lists, this is one of the trickiest concepts to grasp.
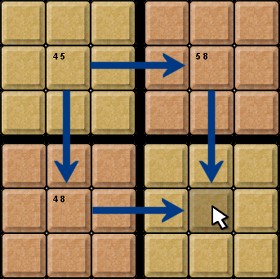
- XY-Wing
An XY-Wing makes good use of combining empty squares that follow a certain pattern. When you have three empty squares along a row and a column you get an L shape .The two outside squares hold a candidate number that is the same as one of the centre square candidate numbers. The two squares also hold one other matching candidate number each. When you follow the two outside squares along either their column or row you will find another square that will force the pattern into a square. If this empty square holds the matching candidate number then it can be removed from that squares candidate list. The XY-Wing technique also has other patterns that work in the same kind of way.
The L shape here is branched out from our square that holds the 4 and the 5. If either 4 ot 5 is the correct number for that square we can follow the L-shape to its other points, where the 4 or the 5 from those squares would be removed, leaving an 8. This tells us that the shadowed square must have candidate number 8 removed.
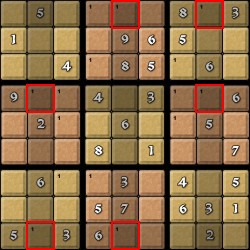
- Colouring
For the colouring technique we are only interested in two squares that share a row, column or block and hold an identical candidate number. This means that one of the squares must hold the true candidate number, for this to work we must colour each of the two squares different colours, one of the coloured squares could also have the same relationship with another square along another row, column or block, we can then colour the new square with the opposite colour of the previous square, so we get a kind of chain forming of opposite colours. When we have two opposite coloured squares in relation with a common square (forming an L shape) we know that one of those squares must be the true candidate number, This then allows us to remove the candidate number from the new square.
We got to this point by first finding square A and B, who hold the same candidate number. From here we found square C, which links nicely with square B and then finally square D which also has candidate 1. Now either D or A because of their colours MUST be a real 1, forcing the shadowed square to remove its candidate 1.
- Forcing Chains
To start a chain you must have a candidate link between empty squares, a link in a chain can be part of a row, column or block. One square must only have two candidates and one candidate must always be the same as the next link in the chain. We take the first link in our chain and systematically go through pretending that one of our candidate numbers is the true one, this will move through each link in the chain whittling down the candidates to one possible true answer (like trial and error). When we reach a dead end, we start over and we do exactly the same thing again with the second candidate number following the path until it reaches another dead end (should be on the same square as the last guess). Now if the two values that were found in our final square were matching, we know that our square has to be that value.
We form our chain by starting with square A and creating a connection with square B through one of its candidate numbers, we then continue our chain and find square C which holds a 3 which links with square B, we continue on the same root for square D and E. We then start from square A and fill in all the values if 2 was indeed the correct answer, we also in turn fill in all the correct answers for all the squares if number 2 was the correct answer. We find that our shadowed square always returns the same value 2. Meaning that whichever route you take that shadwed square E will always be a 2.
- Nishio (Limited Trial and Error)
This is a technique that some Sudoku solvers find conterversial. For each candidate you ask the question: Will placing this number here stop me from completing the other placements of this number? If yes then the candidate can be eliminated.

| Privacy policy | Terms of service | Copyright 2019 Inertia Game Studios |